单节点部署 参考文档 http://www.minio.org.cn/docs/minio/kubernetes/upstream/#quickstart-minio-for-kubernetes ](http://www.minio.org.cn/docs/minio/kubernetes/upstream/#quickstart-minio-for-kubernetes)
部署minIO 创建资源
1
2
3
4
5
6
7
8
9
10
11
12
13
14
15
16
17
18
19
20
21
22
23
24
25
26
27
28
29
30
31
32
33
34
35
36
37
38
39
40
41
42
43
44
45
46
47
48
49
50
51
52
53
54
55
56
57
58
59
60
61
62
63
64
65
66
67
68
69
70
71
72
73
74
75
76
77
78
79
80
[root@k8s-master minio]# cat > minio.yaml << EOF kind: PersistentVolumeClaim apiVersion: v1 metadata: name: minio-pvc namespace: minio spec: storageClassName: nfs-client accessModes: - ReadWriteOnce resources: requests: storage: 50Gi --- apiVersion: apps/v1 kind: Deployment metadata: labels: app: minio name: minio namespace: minio spec: selector: matchLabels: app: minio template: metadata: labels: app: minio spec: containers: - name: minio image: quay.io/minio/minio:latest command: - /bin/bash - -c args: - minio server /data --console-address :9090 volumeMounts: - mountPath: /data name: data ports: - containerPort: 9090 name: console - containerPort: 9000 name: api env: - name: MINIO_ROOT_USER # 指定用户名 value: "admin" - name: MINIO_ROOT_PASSWORD # 指定密码,最少8位置 value: "minioadmin" volumes: - name: data persistentVolumeClaim: claimName: minio-pvc --- apiVersion: v1 kind: Service metadata: name: minio-service namespace: minio spec: type: NodePort selector: app: minio ports: - name: console port: 9090 protocol: TCP targetPort: 9090 nodePort: 30300 - name: api port: 9000 protocol: TCP targetPort: 9000 nodePort: 30200 EOF [root@k8s-master minio]# kubectl apply -f minio.yaml deployment.apps/minio created service/minio-service created
使用NodePort方式访问web页面
1
2
3
4
5
6
[root@k8s-master minio]# kubectl get pod -n minio NAME READY STATUS RESTARTS AGE minio-86577f8755-l65mf 1/1 Running 0 11m [root@k8s-master minio]# kubectl get svc -n minio NAME TYPE CLUSTER-IP EXTERNAL-IP PORT(S) AGE minio-service NodePort 10.102.223.132 <none> 9090:30300/TCP,9000:30200/TCP 10m
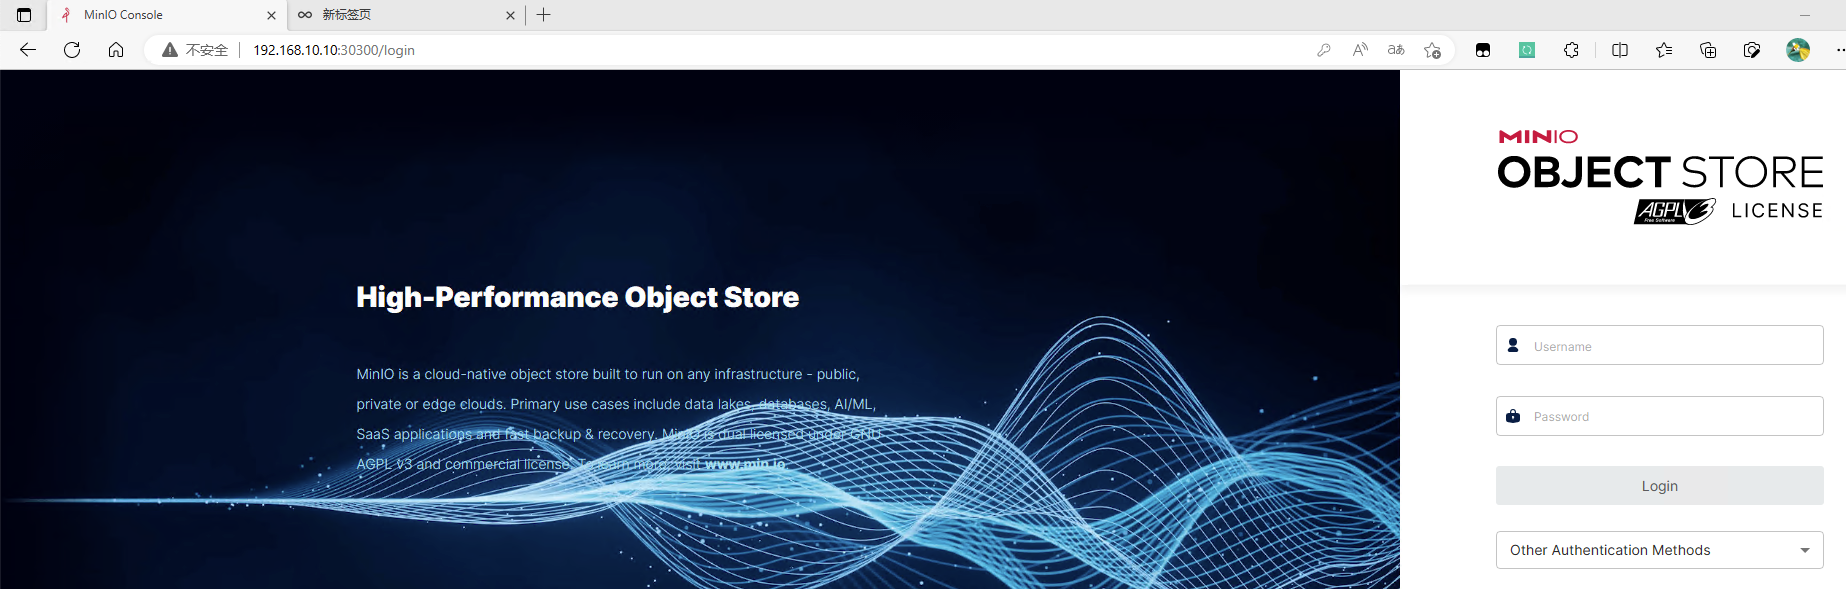
访问k8s节点ip:30300,默认用户名密码都是** admin **
使用ingress方式访问
1
2
3
4
5
6
7
8
9
10
11
12
13
14
15
16
17
18
19
20
21
22
23
24
25
26
27
28
29
30
31
32
33
[root@k8s-master minio]# cat minio-ingress.yaml apiVersion: traefik.io/v1alpha1 kind: IngressRoute metadata: name: minio-console namespace: minio spec: entryPoints: - web routes: - match: Host(`minio.test.com`) # 域名 kind: Rule services: - name: minio-service # 与svc的name一致 port: 9090 # 与svc的port一致 --- apiVersion: traefik.io/v1alpha1 kind: IngressRoute metadata: name: minio-api namespace: minio spec: entryPoints: - web routes: - match: Host(`minio-api.test.com`) # 域名 kind: Rule services: - name: minio-service # 与svc的name一致 port: 9000 # 与svc的port一致 [root@k8s-master minio]# kubectl apply -f minio-ingress.yaml ingressroute.traefik.containo.us/minio-console created ingressroute.traefik.containo.us/minio-api created
添加hosts记录 <font style="background-color:rgba(255, 255, 255, 0);">192.168.10.10 minio.test.com</font>访问域名即可
helm部署minIO集群 minIO集群方式部署使用operator或者helm均可。如果是一套 k8s 集群部署一套 minio 推荐 shiyonghelm 方式部署,operator 更适合多套 minio 集群多租户场景使用。
helm部署minIO参考文档: https://artifacthub.io/packages/helm/bitnami/minio 。
集群角色规划 使用分布式方式部署高可用的minIO集群时,驱动器总数至少是4 个,以保证纠删码。我们可以在k8s-work1和k8s-work2上的data1和data2路径存放minIO数据,使用local pv方式持久化数据。
1
2
3
4
5
# 创建数据存放路径 [root@k8s-work1 ~]# mkdir -p /data1/minio [root@k8s-work1 ~]# mkdir -p /data2/minio [root@k8s-work2 ~]# mkdir -p /data1/minio [root@k8s-work2 ~]# mkdir -p /data2/minio
下载helm包 1 2 3 4 5 6 7 8 [root@k8s-master ~]# helm repo add bitnami https://charts.bitnami.com/bitnami [root@k8s-master ~]# helm search repo minio NAME CHART VERSION APP VERSION DESCRIPTION bitnami/minio 14.1.4 2024.3.30 MinIO(R) is an object storage server, compatibl... [root@k8s-master ~]# helm pull bitnami/minio --untar [root@k8s-master ~]# cd minio [root@k8s-master minio]# ls Chart.lock charts Chart.yaml README.md templates values.yaml
创建sc provisioner 字段定义为 no-provisioner,这是因为 Local Persistent Volume 目前尚不支持 Dynamic Provisioning 动态生成 PV,所以我们需要提前手动创建 PV。 volumeBindingMode 字段定义为 WaitForFirstConsumer,它是 Local Persistent Volume 里一个非常重要的特性,即:延迟绑定。延迟绑定就是在我们提交 PVC 文件时,StorageClass 为我们延迟绑定 PV 与 PVC 的对应关系。
1 2 3 4 5 6 7 8 9 10 11 12 13 [root@k8s-master minio]# cat > storageClass.yaml << EOF apiVersion: storage.k8s.io/v1 kind: StorageClass metadata: name: local-storage provisioner: kubernetes.io/no-provisioner volumeBindingMode: WaitForFirstConsumer EOF [root@k8s-master minio]# kubectl apply -f storageClass.yaml storageclass.storage.k8s.io/local-storage created [root@k8s-master minio]# kubectl get storageclass NAME PROVISIONER RECLAIMPOLICY VOLUMEBINDINGMODE ALLOWVOLUMEEXPANSION AGE local-storage kubernetes.io/no-provisioner Delete WaitForFirstConsumer false 19s
创建pv pv资源分布如下:
pv名称 pvc名称 主机 路径 容量
minio-pv1 data-minio-0 work1 /data1/minio 10G
minio-pv2 data-minio-1 work1 /data2/minio 10G
minio-pv3 data-minio-2 work2 /data1/minio 10G
minio-pv4 data-minio-3 work2 /data2/minio 10G
1 2 3 4 5 6 7 8 9 10 11 12 13 14 15 16 17 18 19 20 21 22 23 24 25 26 27 28 29 30 31 32 33 34 35 36 37 38 39 40 41 42 43 44 45 46 47 48 49 50 51 52 53 54 55 56 57 58 59 60 61 62 63 64 65 66 67 68 69 70 71 72 73 74 75 76 77 78 79 80 81 82 83 84 85 86 87 88 89 90 91 92 93 94 95 96 97 98 99 100 101 102 103 104 105 106 107 [root@k8s-master minio]# cat > pv.yaml << EOF apiVersion: v1 kind: PersistentVolume metadata: name: minio-pv1 labels: app: minio-0 spec: capacity: storage: 10Gi volumeMode: Filesystem accessModes: - ReadWriteOnce storageClassName: local-storage # storageClass名称,与前面创建的storageClass保持一致 local: path: /data1/minio # 本地存储路径 nodeAffinity: # 调度至work1节点 required: nodeSelectorTerms: - matchExpressions: - key: kubernetes.io/hostname operator: In values: - work1 --- apiVersion: v1 kind: PersistentVolume metadata: name: minio-pv2 labels: app: minio-1 spec: capacity: storage: 10Gi volumeMode: Filesystem accessModes: - ReadWriteOnce storageClassName: local-storage local: path: /data2/minio nodeAffinity: required: nodeSelectorTerms: - matchExpressions: - key: kubernetes.io/hostname operator: In values: - work1 --- apiVersion: v1 kind: PersistentVolume metadata: name: minio-pv3 labels: app: minio-2 spec: capacity: storage: 10Gi volumeMode: Filesystem accessModes: - ReadWriteOnce storageClassName: local-storage local: path: /data1/minio nodeAffinity: required: nodeSelectorTerms: - matchExpressions: - key: kubernetes.io/hostname operator: In values: - work2 --- apiVersion: v1 kind: PersistentVolume metadata: name: minio-pv4 labels: app: minio-3 spec: capacity: storage: 10Gi volumeMode: Filesystem accessModes: - ReadWriteOnce storageClassName: local-storage local: path: /data2/minio nodeAffinity: required: nodeSelectorTerms: - matchExpressions: - key: kubernetes.io/hostname operator: In values: - work2 EOF [root@master1 minio]# kubectl apply -f pv.yaml persistentvolume/minio-pv1 created persistentvolume/minio-pv2 created persistentvolume/minio-pv3 created persistentvolume/minio-pv4 created [root@master1 minio]# kubectl get pv | grep minio minio-pv1 10Gi RWO Delete Bound minio/data-minio-1 local-storage 9s minio-pv2 10Gi RWO Delete Bound minio/data-minio-2 local-storage 9s minio-pv3 10Gi RWO Delete Bound minio/data-minio-3 local-storage 9s minio-pv4 10Gi RWO Delete Bound minio/data-minio-0 local-storage 9s
创建pvc 创建的时候注意pvc的名字的构成:pvc的名字 = volume_name-statefulset_name-序号,然后通过selector标签选择,强制将pvc与pv绑定。
1
2
3
4
5
6
7
8
9
10
11
12
13
14
15
16
17
18
19
20
21
22
23
24
25
26
27
28
29
30
31
32
33
34
35
36
37
38
39
40
41
42
43
44
45
46
47
48
49
50
51
52
53
54
55
56
57
58
59
60
61
62
63
64
65
66
67
68
69
70
71
72
73
74
75
76
77
78
[root@master1 minio]# cat > pvc.yaml << EOF apiVersion: v1 kind: PersistentVolumeClaim metadata: name: data-minio-0 namespace: minio spec: accessModes: - ReadWriteOnce resources: requests: storage: 10Gi storageClassName: local-storage selector: matchLabels: app: minio-0 --- apiVersion: v1 kind: PersistentVolumeClaim metadata: name: data-minio-1 namespace: minio spec: accessModes: - ReadWriteOnce resources: requests: storage: 10Gi storageClassName: local-storage selector: matchLabels: app: minio-1 --- apiVersion: v1 kind: PersistentVolumeClaim metadata: name: data-minio-2 namespace: minio spec: accessModes: - ReadWriteOnce resources: requests: storage: 10Gi storageClassName: local-storage selector: matchLabels: app: minio-2 --- apiVersion: v1 kind: PersistentVolumeClaim metadata: name: data-minio-3 namespace: minio spec: accessModes: - ReadWriteOnce resources: requests: storage: 10Gi storageClassName: local-storage selector: matchLabels: app: minio-3 EOF [root@tiaoban minio]# kubectl create ns minio namespace/minio created [root@tiaoban minio]# kubectl apply -f pvc.yaml persistentvolumeclaim/data-minio-0 created persistentvolumeclaim/data-minio-1 created persistentvolumeclaim/data-minio-2 created persistentvolumeclaim/data-minio-3 created [root@tiaoban minio]# kubectl get pvc -n minio NAME STATUS VOLUME CAPACITY ACCESS MODES STORAGECLASS AGE data-minio-0 Pending local-storage 13s data-minio-1 Pending local-storage 13s data-minio-2 Pending local-storage 13s data-minio-3 Pending local-storage 13s
修改配置 修改配置values.yaml
1
2
3
4
5
6
7
8
9
10
11
12
13
14
15
16
17
18
19
20
21
22
23
24
25
26
27
68 image: 69 registry: docker.io 70 repository: bitnami/minio 71 tag: 2024.3.30-debian-12-r0 104 mode: distributed # 集群模式,单节点为standalone,分布式集群为distributed 197 statefulset: 215 replicaCount: 2 # 节点数 218 zones: 1 # 区域数,1个即可 221 drivesPerNode: 2 # 每个节点数据目录数.2节点×2目录组成4节点的mimio集群 558 #podAnnotations: {} # 导出Prometheus指标 559 podAnnotations: 560 prometheus.io/scrape: "true" 561 prometheus.io/path: "/minio/v2/metrics/cluster" 562 prometheus.io/port: "9000" 1049 persistence: 1052 enabled: true 1060 storageClass: "local-storage" 1063 mountPath: /bitnami/minio/data 1066 accessModes: 1067 - ReadWriteOnce 1070 size: 10Gi 1073 annotations: {} 1076 existingClaim: ""
部署minIO
1
2
3
4
5
6
7
8
9
10
11
12
13
14
15
16
17
18
19
20
21
22
23
24
25
26
27
28
29
30
31
32
33
34
35
36
37
38
39
40
41
42
43
44
45
[root@k8s-master minio]# kubectl create ns minio [root@k8s-master minio]# helm install minio . -f values.yaml -n minio NAME: minio LAST DEPLOYED: Tue Apr 2 22:28:03 2024 NAMESPACE: minio STATUS: deployed REVISION: 1 TEST SUITE: None NOTES: CHART NAME: minio CHART VERSION: 14.1.4 APP VERSION: 2024.3.30 ** Please be patient while the chart is being deployed ** MinIO® can be accessed via port on the following DNS name from within your cluster: minio.minio.svc.cluster.local To get your credentials run: export ROOT_USER=$(kubectl get secret --namespace minio minio -o jsonpath="{.data.root-user}" | base64 -d) export ROOT_PASSWORD=$(kubectl get secret --namespace minio minio -o jsonpath="{.data.root-password}" | base64 -d) To connect to your MinIO® server using a client: - Run a MinIO® Client pod and append the desired command (e.g. 'admin info'): kubectl run --namespace minio minio-client \ --rm --tty -i --restart='Never' \ --env MINIO_SERVER_ROOT_USER=$ROOT_USER \ --env MINIO_SERVER_ROOT_PASSWORD=$ROOT_PASSWORD \ --env MINIO_SERVER_HOST=minio \ --image docker.io/bitnami/minio-client:2024.3.30-debian-12-r0 -- admin info minio To access the MinIO® web UI: - Get the MinIO® URL: echo "MinIO® web URL: http://127.0.0.1:9001/minio" kubectl port-forward --namespace minio svc/minio 9001:9001 WARNING: There are "resources" sections in the chart not set. Using "resourcesPreset" is not recommended for production. For production installations, please set the following values according to your workload needs: - resources +info https://kubernetes.io/docs/concepts/configuration/manage-resources-containers/
查看资源信息 1 2 3 4 5 6 7 8 9 10 11 12 13 [root@master1 minio]# kubectl get all -n minio NAME READY STATUS RESTARTS AGE pod/minio-0 1/1 Running 0 15s pod/minio-1 1/1 Running 0 15s pod/minio-2 1/1 Running 0 15s pod/minio-3 1/1 Running 0 14s NAME TYPE CLUSTER-IP EXTERNAL-IP PORT(S) AGE service/minio ClusterIP 10.106.74.147 <none> 9000/TCP,9001/TCP 15s service/minio-headless ClusterIP None <none> 9000/TCP,9001/TCP 15s NAME READY AGE statefulset.apps/minio 4/4 15s
创建ingress资源 以ingrss-nginx为例:
1 2 3 4 5 6 7 8 9 10 11 12 13 14 15 16 17 18 19 20 21 22 # cat > ingress.yaml << EOF apiVersion: networking.k8s.io/v1 kind: Ingress metadata: name: minio-ingreess namespace: minio annotations: nginx.ingress.kubernetes.io/rewrite-target: / spec: ingressClassName: nginx rules: - host: minio.local.com http: paths: - path: / pathType: Prefix backend: service: name: minio port: number: 9001 EOF
以traefik为例:
1 2 3 4 5 6 7 8 9 10 11 12 13 14 15 16 17 18 19 20 21 22 23 24 25 26 27 28 29 30 31 32 33 [root@k8s-master minio]# cat ingress.yaml apiVersion: traefik.containo.us/v1alpha1 kind: IngressRoute metadata: name: minio-console namespace: minio spec: entryPoints: - web routes: - match: Host(`minio.local.com`) # 域名 kind: Rule services: - name: minio # 与svc的name一致 port: 9001 # 与svc的port一致 --- apiVersion: traefik.containo.us/v1alpha1 kind: IngressRoute metadata: name: minio-api namespace: minio spec: entryPoints: - web routes: - match: Host(`minio-api.local.com`) # 域名 kind: Rule services: - name: minio # 与svc的name一致 port: 9000 # 与svc的port一致 [root@k8s-master minio]# kubectl apply -f ingress.yaml ingressroute.traefik.containo.us/minio-console created ingressroute.traefik.containo.us/minio-api created
获取用户名密码 1 2 3 4 5 # 获取用户名和密码 [root@k8s-master minio]# kubectl get secret --namespace minio minio -o jsonpath="{.data.root-user}" | base64 -d admin [root@k8s-master minio]# kubectl get secret --namespace minio minio -o jsonpath="{.data.root-password}" | base64 -d HWLLGMhgkp
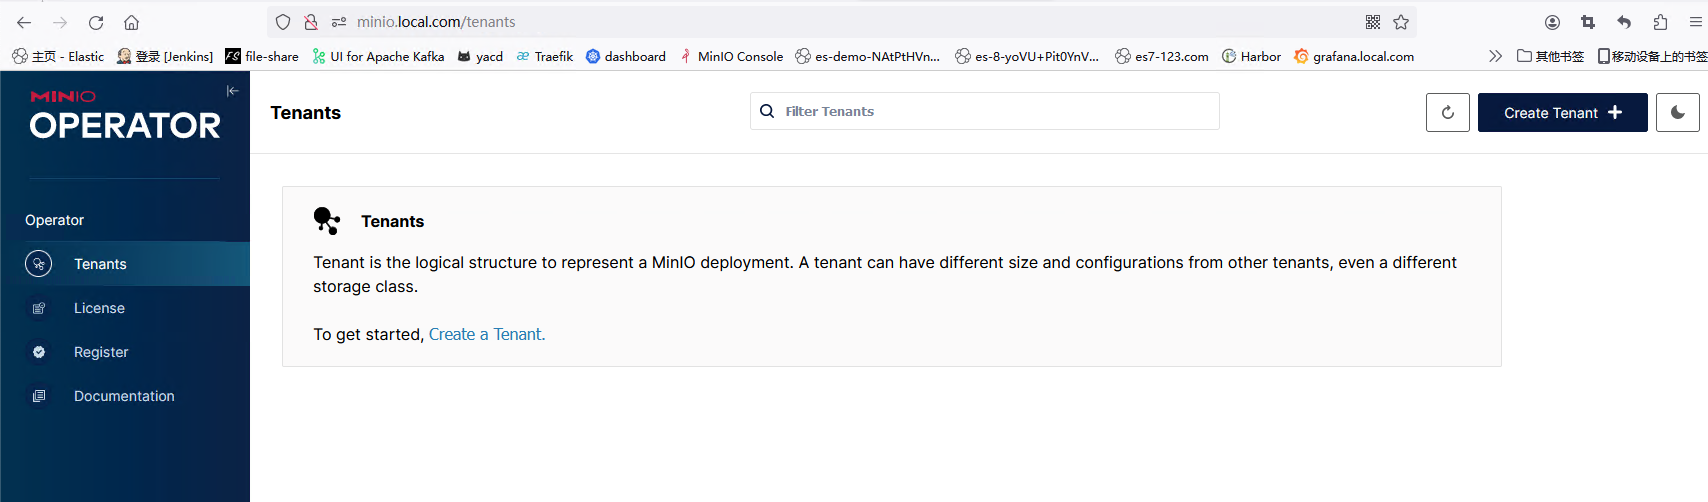
访问web管理页 operator部署minIO 参考文档: https://min.io/docs/minio/kubernetes/upstream/operations/installation.html
安装operator 1 2 3 4 5 6 7 8 9 10 11 12 13 14 15 16 17 18 19 20 21 22 23 24 25 26 27 28 29 30 31 32 33 34 35 36 37 38 39 40 41 42 43 44 45 46 47 48 49 50 51 52 [root@master1 ~]# helm repo add minio-operator https://operator.min.io "minio-operator" has been added to your repositories [root@master1 ~]# helm search repo minio-operator NAME CHART VERSION APP VERSION DESCRIPTION minio-operator/minio-operator 4.3.7 v4.3.7 A Helm chart for MinIO Operator minio-operator/operator 5.0.14 v5.0.14 A Helm chart for MinIO Operator minio-operator/tenant 5.0.14 v5.0.14 A Helm chart for MinIO Operator [root@master1 ~]# helm install \ --namespace minio-operator \ --create-namespace \ operator minio-operator/operator NAME: operator LAST DEPLOYED: Sun Mar 24 21:47:05 2024 NAMESPACE: minio-operator STATUS: deployed REVISION: 1 TEST SUITE: None NOTES: 1. Get the JWT for logging in to the console: kubectl apply -f - <<EOF apiVersion: v1 kind: Secret metadata: name: console-sa-secret namespace: minio-operator annotations: kubernetes.io/service-account.name: console-sa type: kubernetes.io/service-account-token EOF kubectl -n minio-operator get secret console-sa-secret -o jsonpath="{.data.token}" | base64 --decode 2. Get the Operator Console URL by running these commands: kubectl --namespace minio-operator port-forward svc/console 9090:9090 echo "Visit the Operator Console at http://127.0.0.1:9090" [root@master1 ~]# kubectl get all -n minio-operator NAME READY STATUS RESTARTS AGE console-658c74c776-mjdq7 1/1 Running 0 3m minio-operator-5fb5486696-b494r 1/1 Running 0 3m minio-operator-5fb5486696-txds7 1/1 Running 0 3m NAME TYPE CLUSTER-IP EXTERNAL-IP PORT(S) AGE service/console ClusterIP 10.98.101.3 <none> 9090/TCP,9443/TCP 6s service/operator ClusterIP 10.100.70.152 <none> 4221/TCP 6s service/sts ClusterIP 10.109.22.187 <none> 4223/TCP 6s NAME READY UP-TO-DATE AVAILABLE AGE deployment.apps/console 1/1 1 1 39m deployment.apps/minio-operator 2/2 2 2 39m NAME DESIRED CURRENT READY AGE replicaset.apps/console-59cbf8fbfb 1 1 1 6s replicaset.apps/minio-operator-6868bf476d 2 2 2 6s
访问控制台 创建ingress资源,以traefik为例
1 2 3 4 5 6 7 8 9 10 11 12 13 14 apiVersion: traefik.containo.us/v1alpha1 kind: IngressRoute metadata: name: minio-console namespace: minio-operator spec: entryPoints: - web routes: - match: Host(`minio.local.com`) # 域名 kind: Rule services: - name: console # 与svc的name一致 port: 9090 # 与svc的port一致
获取token
1 2 [root@tiaoban minio]# kubectl get secret/console-sa-secret -n minio-operator -o json | jq -r ".data.token" | base64 -d eyJhbGciOiJSUzI1NiIsImtpZCI6IkJqajJ5XzA1LTdjWmhWWTJhUWdtNW5pMHJsejI4Z0d5MjlsWHg1YjF3NG8ifQ.eyJpc3MiOiJrdWJlcm5ldGVzL3NlcnZpY2VhY2NvdW50Iiwia3ViZXJuZXRlcy5pby9zZXJ2aWNlYWNjb3VudC9uYW1lc3BhY2UiOiJtaW5pby1vcGVyYXRvciIsImt1YmVybmV0ZXMuaW8vc2VydmljZWFjY291bnQvc2VjcmV0Lm5hbWUiOiJjb25zb2xlLXNhLXNlY3JldCIsImt1YmVybmV0ZXMuaW8vc2VydmljZWFjY291bnQvc2VydmljZS1hY2NvdW50Lm5hbWUiOiJjb25zb2xlLXNhIiwia3ViZXJuZXRlcy5pby9zZXJ2aWNlYWNjb3VudC9zZXJ2aWNlLWFjY291bnQudWlkIjoiZTA2NmRjOTQtMmI5NS00ODllLTk1MzQtNDdjNTY5MzI0YjQxIiwic3ViIjoic3lzdGVtOnNlcnZpY2VhY2NvdW50Om1pbmlvLW9wZXJhdG9yOmNvbnNvbGUtc2EifQ.0828UMXxhkESZtTo6xUtJRDqHf8ksVNGUVOZas7dIMCPeF9Z2nLZDySMFXBc4qYUb-qGEw5YT0JYxhz_B82Cy-Lg05RaawCmFWlf4Q5O57xdOZ66sUJffRNprqd4uzLejvirtwgzpD6ddiIg4HVN107VIy--S-A-OTbvbrSWtO95GIu4eNG5pM0YALrYAXPuDbBzRsQ9DHjH9dEoXsJW_yhwmlMoIm4Qi4RR4SSRBuVVRvU38DGvg2eZjveSDDJiozOLuGvw3HTPHuamdneEpdfQzCysMEkUm0eZa_uG-5aoSINd7peB9CBPkSx91tM3aX4E1lyN6Q5SVmr3v7o31w
浏览器访问minio
helm创建租户 拉取helm包
1 2 3 4 [root@master1 ~]# helm pull minio-operator/tenant --untar [root@master1 ~]# cd tenant/ [root@master1 tenant]# ls Chart.yaml README.md templates values.yaml
修改values.yaml
1 2 3 4 5 6 7 8 9 10 11 12 39 tenant: 44 name: k8s-minio 68 image: 69 repository: harbor.local.com/minio 70 tag: RELEASE.2024-03-21T23-13-43Z 91 pools: 96 - servers: 4 # 服务器数 102 volumesPerServer: 1 # 每个服务器节点数 105 size: 10Gi # 每个节点大小 112 storageClassName: local-storage
安装helm
1 2 3 4 5 6 7 8 9 10 11 12 13 [root@master1 tenant]# helm install tenant . -f values.yaml -n minio NAME: tenant LAST DEPLOYED: Sun Mar 24 23:12:11 2024 NAMESPACE: minio STATUS: deployed REVISION: 1 TEST SUITE: None NOTES: To connect to the k8s-minio tenant if it doesn't have a service exposed, you can port-forward to it by running: kubectl --namespace minio port-forward svc/k8s-minio-console 9443:9443 Then visit the MinIO Console at https://127.0.0.1:9443
web页面创建租户 Prometheus Operator添加监控 访问metrics接口验证 1 2 3 4 5 6 7 8 9 10 11 12 13 14 15 16 17 18 [root@master1 minio]# kubectl get svc -n minio NAME TYPE CLUSTER-IP EXTERNAL-IP PORT(S) AGE minio ClusterIP 10.103.75.63 <none> 9000/TCP,9001/TCP 71m minio-headless ClusterIP None <none> 9000/TCP,9001/TCP 71m [root@rocky /]# curl http://10.103.75.63:9000/minio/v2/metrics/cluster # HELP minio_audit_failed_messages Total number of messages that failed to send since start # TYPE minio_audit_failed_messages counter minio_audit_failed_messages{server="minio-0.minio-headless.minio.svc.cluster.local:9000",target_id="sys_console_0"} 0 minio_audit_failed_messages{server="minio-1.minio-headless.minio.svc.cluster.local:9000",target_id="sys_console_0"} 0 minio_audit_failed_messages{server="minio-2.minio-headless.minio.svc.cluster.local:9000",target_id="sys_console_0"} 0 minio_audit_failed_messages{server="minio-3.minio-headless.minio.svc.cluster.local:9000",target_id="sys_console_0"} 0 # HELP minio_audit_target_queue_length Number of unsent messages in queue for target # TYPE minio_audit_target_queue_length gauge minio_audit_target_queue_length{server="minio-0.minio-headless.minio.svc.cluster.local:9000",target_id="sys_console_0"} 0 minio_audit_target_queue_length{server="minio-1.minio-headless.minio.svc.cluster.local:9000",target_id="sys_console_0"} 0 minio_audit_target_queue_length{server="minio-2.minio-headless.minio.svc.cluster.local:9000",target_id="sys_console_0"} 0 minio_audit_target_queue_length{server="minio-3.minio-headless.minio.svc.cluster.local:9000",target_id="sys_console_0"} 0 …………
新增svc标签 1 2 3 4 5 6 7 8 9 10 [root@master1 minio]# kubectl edit svc -n minio minio apiVersion: v1 kind: Service metadata: annotations: meta.helm.sh/release-name: minio meta.helm.sh/release-namespace: minio creationTimestamp: "2024-03-24T07:52:49Z" labels: app: minio # 新增labels标签
新增ServiceMonitor 1 2 3 4 5 6 7 8 9 10 11 12 13 14 15 16 17 18 19 [root@master1 minio]# cat ServiceMonitor.yaml apiVersion: monitoring.coreos.com/v1 kind: ServiceMonitor metadata: name: minio-exporter # ServiceMonitor名称 namespace: monitoring # ServiceMonitor所在名称空间 spec: jobLabel: minio # job名称 endpoints: # prometheus所采集Metrics地址配置,endpoints为一个数组,可以创建多个,但是每个endpoints包含三个字段interval、path、port - interval: 30s # prometheus采集数据的周期,单位为秒 path: /minio/v2/metrics/cluster # prometheus采集数据的路径 port: minio-api # prometheus采集数据的端口,这里为port的name,主要是通过spec.selector中选择对应的svc,在选中的svc中匹配该端口 scheme: http # 协议 namespaceSelector: # 需要发现svc的范围 matchNames: - minio selector: matchLabels: # 选择svc的标签 app: minio
Prometheus targets验证
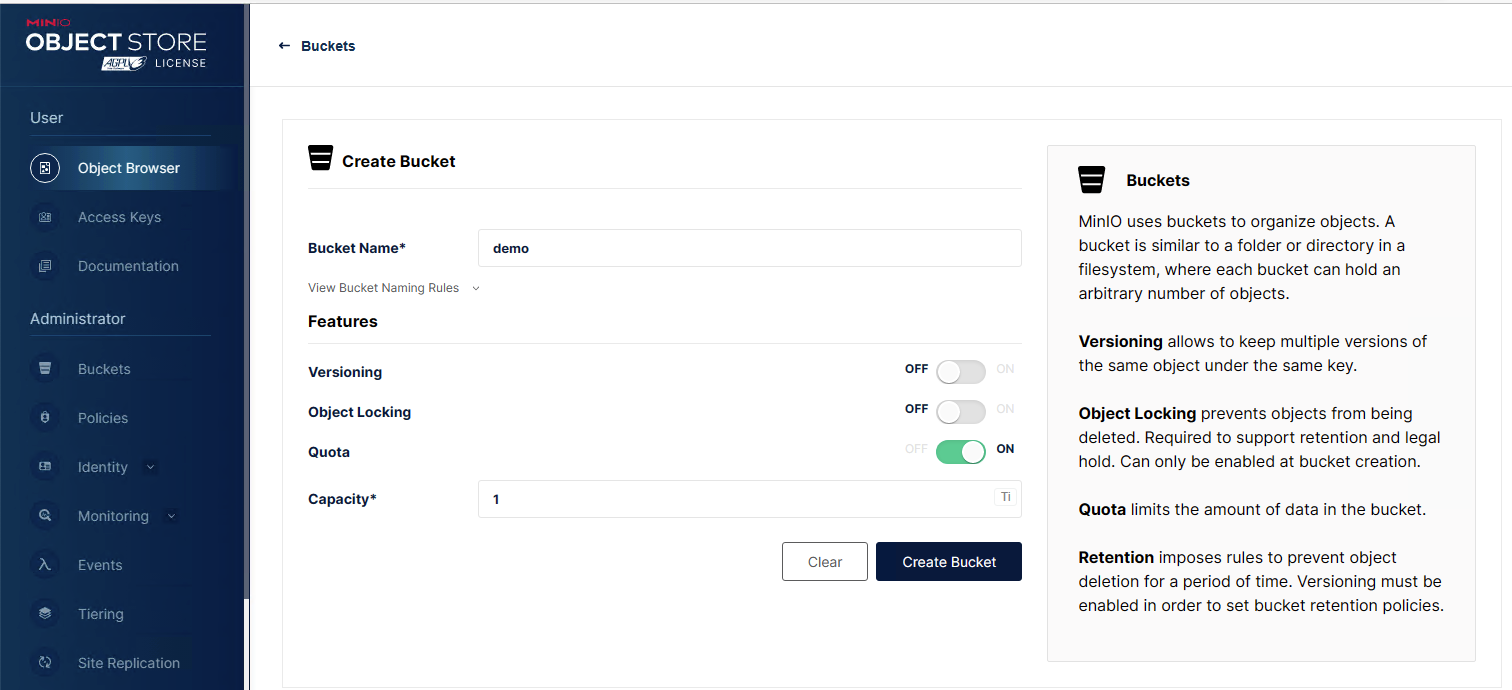
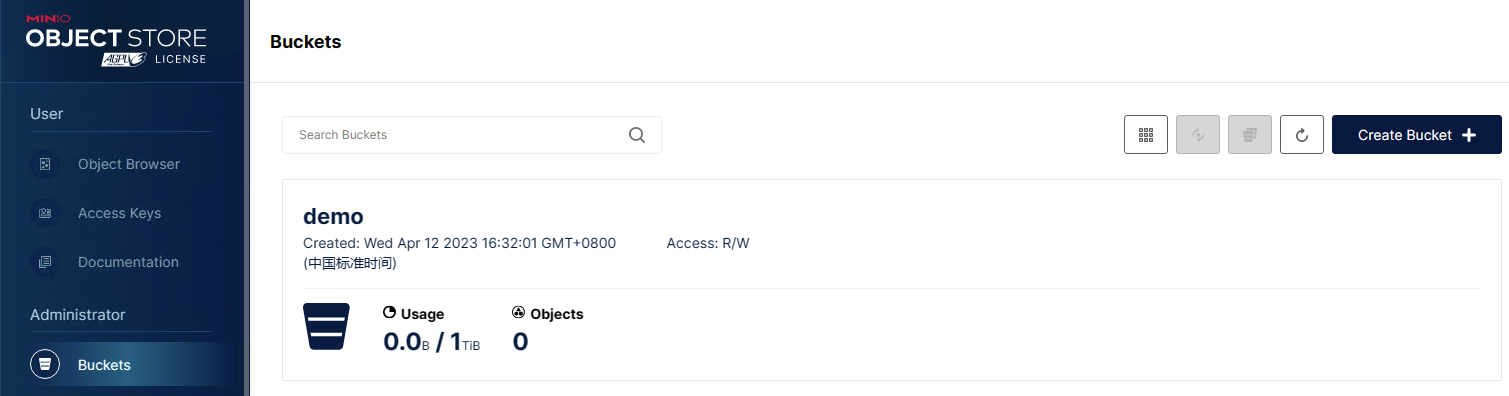
minIO使用 创建bucket
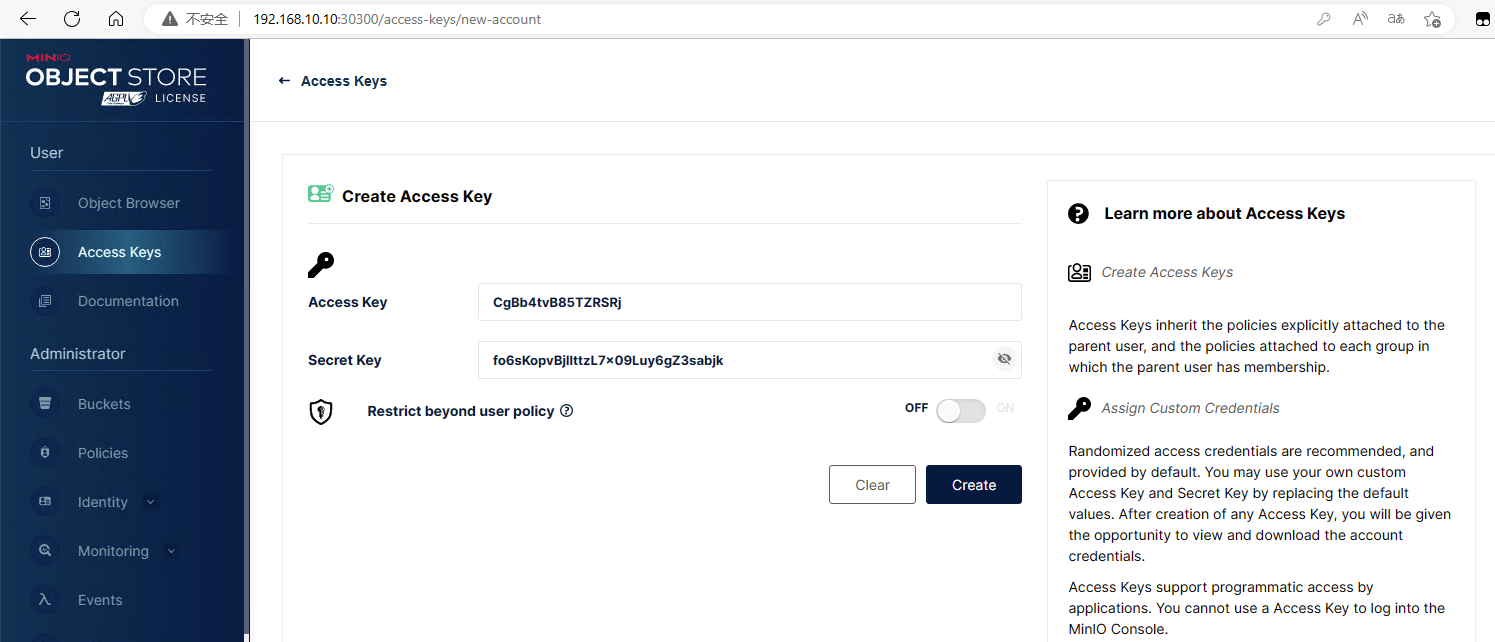
创建Access Keys
创建访问控制权限 Minio 的存储桶默认是不跟任何 Acess Key 关联的,不过由于 Minio 支持标准的 S3 协议,我们可以给 Access Key 授予某个 Bucket 存储桶的访问权限,实现 Key 和 Bucket 的绑定。
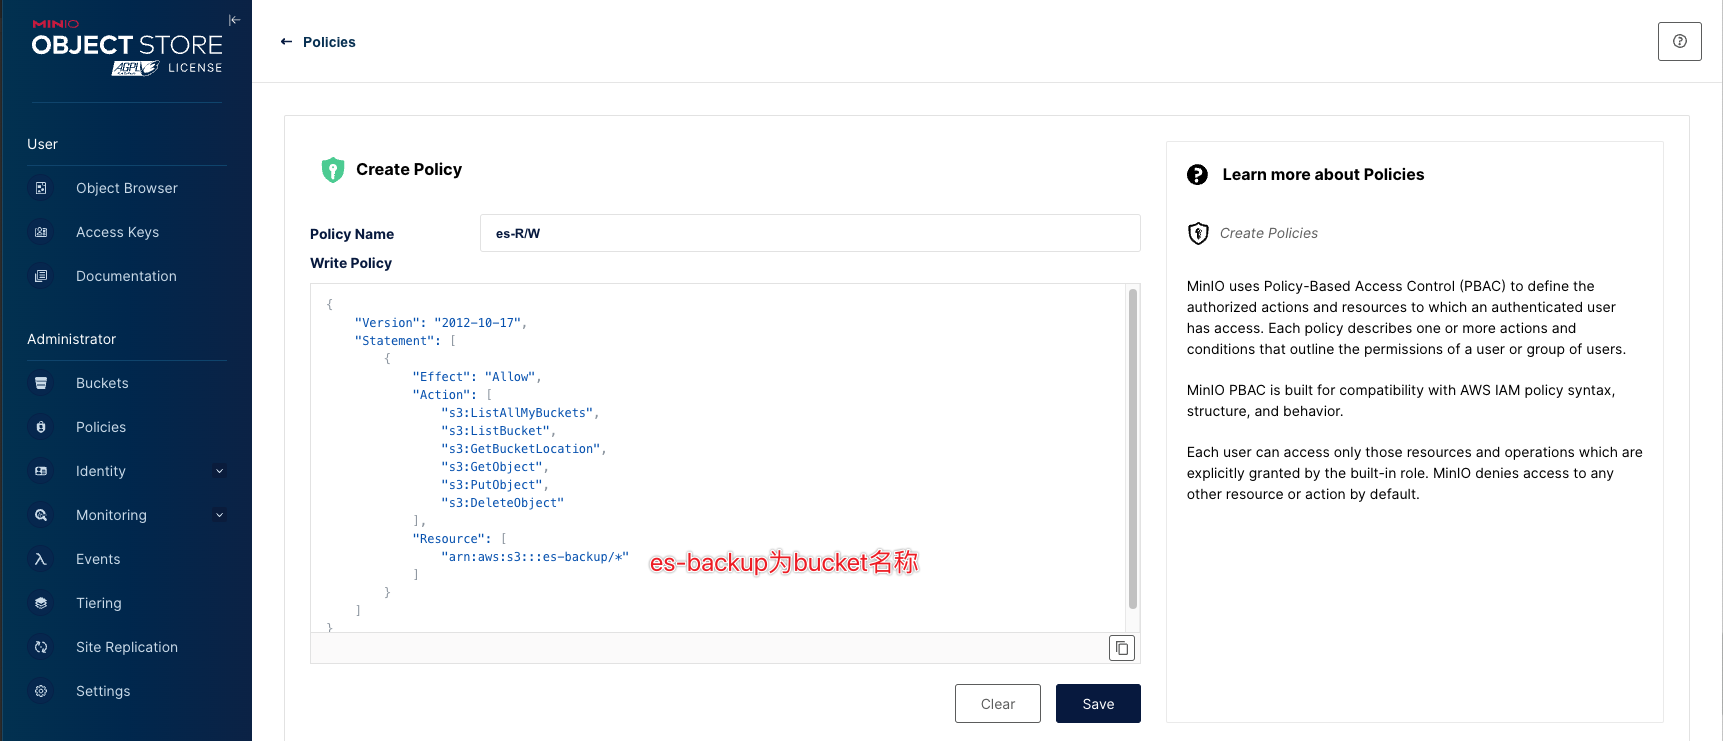
创建policy
1 2 3 4 5 6 7 8 9 10 11 12 13 14 15 16 17 18 19 { "Version": "2012-10-17", "Statement": [ { "Effect": "Allow", "Action": [ "s3:ListAllMyBuckets", "s3:ListBucket", "s3:GetBucketLocation", "s3:GetObject", "s3:PutObject", "s3:DeleteObject" ], "Resource": [ "arn:aws:s3:::es-backup/*" ] } ] }
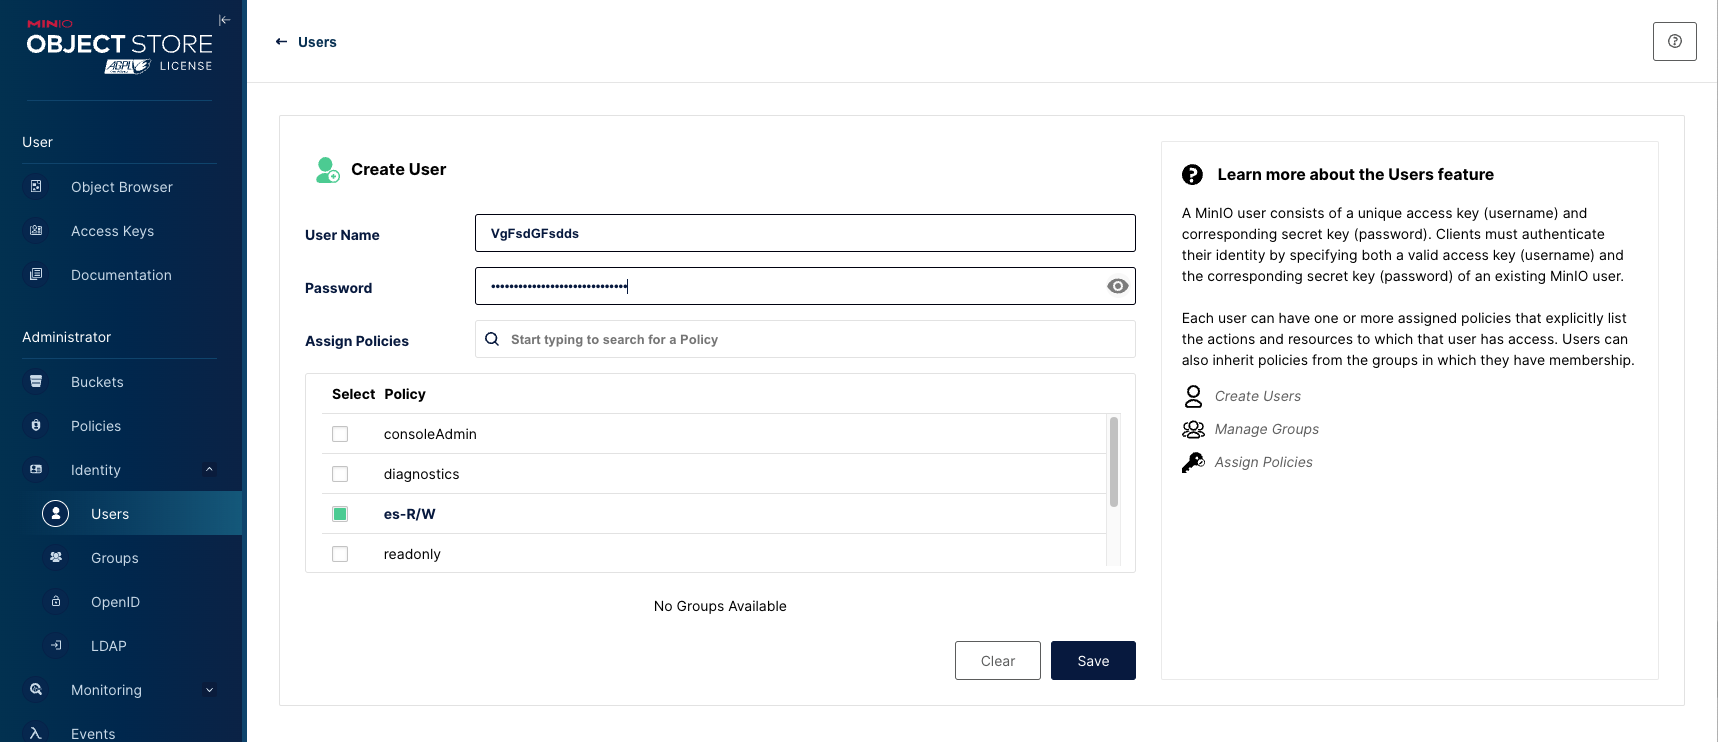
创建user
这里 Access Key 是用户名,Access Secret 是对应的口令。设置时关联上刚才创建的 Policy 即可。
我们就创建了一个新的存储桶,并且给这个存储桶设置了一个用户,同时授权了用户对存储桶的访问,包括列表、上传、下载这几个基本权限。
mc客户端使用 MinIO Client (mc)为ls,cat,cp,mirror,diff,find等UNIX命令提供了一种替代方案。它支持文件系统和兼容Amazon S3的云存储服务(AWS Signature v2和v4)。
安装mc客户端(Linux二进制文件) 1 2 3 4 5 6 7 8 9 10 11 12 13 14 15 16 17 18 19 [root@k8s-master minio]# curl https://dl.min.io/client/mc/release/linux-amd64/mc --create-dirs -o /usr/local/minio-binaries/mc [root@k8s-master local]# cd /usr/local/minio-binaries [root@k8s-master minio-binaries]# ls mc [root@k8s-master minio-binaries]# chmod +x mc [root@k8s-master minio-binaries]# ./mc --help ──────────────────────────────────────────────────────────────────────────────────────────────────────────────────────────────────────────────────────── (q)uit/esc NAME: mc - MinIO Client for object storage and filesystems. USAGE: mc [FLAGS] COMMAND [COMMAND FLAGS | -h] [ARGUMENTS...] # 添加环境变量 [root@k8s-master minio-binaries]# cat /etc/profile export PATH="$PATH:/usr/local/minio-binaries" [root@k8s-master minio-binaries]# source /etc/profile [root@k8s-master minio-binaries]# mc --help ──────────────────────────────────────────────────────────────────────────────────────────────────────────────────────────────────────────────────────── (q)uit/esc mc [FLAGS] COMMAND [COMMAND FLAGS | -h] [ARGUMENTS...]
安装mc客户端(docker) 1 2 3 4 5 6 7 8 [root@tiaoban ~]# docker run -it --rm minio/mc ls play mc: Configuration written to `/root/.mc/config.json`. Please update your access credentials. mc: Successfully created `/root/.mc/share`. mc: Initialized share uploads `/root/.mc/share/uploads.json` file. mc: Initialized share downloads `/root/.mc/share/downloads.json` file. [2023-04-13 01:39:27 UTC] 0B 64375d4bed2b146c15d5383f-files/ [2023-03-15 11:55:17 UTC] 0B abc/ [2023-03-31 18:46:54 UTC] 0B awdkenny/
mc客户端常用命令
命令 功能
ls 列出文件和文件夹。
mb 创建一个存储桶或一个文件夹。
cat 显示文件和对象内容。
pipe 将一个STDIN重定向到一个对象或者文件或者STDOUT。
share 生成用于共享的URL。
cp 拷贝文件和对象。
mirror 给存储桶和文件夹做镜像。
find 基于参数查找文件。
diff 对两个文件夹或者存储桶比较差异。
rm 删除文件和对象。
events 管理对象通知。
watch 监视文件和对象的事件。
policy 管理访问策略。
config 管理mc配置文件。
update 检查软件更新。
version 输出版本信息。
mc连接minIO服务 1 2 3 4 5 6 7 8 9 10 11 12 13 14 15 16 # 添加对象存储服务 [root@k8s-master minio-binaries]# mc alias set k8s-minio http://10.102.223.132:9000 minioadmin minioadmin Added `k8s-minio` successfully. [root@k8s-master minio-binaries]# mc admin info k8s-minio ● 10.102.223.132:9000 Uptime: 41 minutes Version: 2023-04-07T05:28:58Z Network: 1/1 OK Drives: 1/1 OK Pool: 1 Pools: 1st, Erasure sets: 1, Drives per erasure set: 1 12 MiB Used, 1 Bucket, 2 Objects 1 drive online, 0 drives offline
bucket操作 1 2 3 4 5 6 7 8 9 10 11 # 创建bucket [root@k8s-master ~]# mc mb k8s-minio/test Bucket created successfully `k8s-minio/test`. # 查看bucket [root@k8s-master ~]# mc ls k8s-minio [2023-04-13 10:02:02 CST] 0B test/ # 删除没有文件的bucket [root@k8s-master ~]# mc rb k8s-minio/demo # 删除有文件的bucket [root@k8s-master ~]# mc rb k8s-minio/test --force
上传下载操作 1 2 3 4 5 6 7 8 9 10 11 12 13 14 15 16 17 18 19 # 上传文件到bucket [root@k8s-master ~]# mc cp /etc/hosts k8s-minio/test /etc/hosts: 2.09 KiB / 2.09 KiB ━━━━━━━━━━━━━━━━━━━━━━━━━━━━━━━━━━━━━━━━━━━━━━━━━━━━━━━━━━━━━━━━━━━━━━━━━━━━━━━━━━━━━━━━━━━━━━━━━━ 60.07 KiB/s 0s[root@k8s-master ~]# mc cp /etc/yum.repos.d k8s-minio/test # 上传目录到bucket [root@k8s-master ~]# mc cp /etc/yum.repos.d k8s-minio/test --recursive ...m.repos.d/kubernetes.repo: 19.46 KiB / 19.46 KiB ━━━━━━━━━━━━━━━━━━━━━━━━━━━━━━━━━━━━━━━━━━━━━━━━━━━━━━━━━━━━━━━━━━━━━━━━━━━━━━━━━━━━━━━━━━━━━━━ 121.99 KiB/s 0s # 下载bucket文件到本地 [root@k8s-master ~]# mkdir /tmp/download [root@k8s-master ~]# mc cp k8s-minio/test/hosts /tmp/download/ ...2.223.132:9000/test/hosts: 2.09 KiB / 2.09 KiB ━━━━━━━━━━━━━━━━━━━━━━━━━━━━━━━━━━━━━━━━━━━━━━━━━━━━━━━━━━━━━━━━━━━━━━━━━━━━━━━━━━━━━━━━━━━━━━━━━━ 66.18 KiB/s 0s[root@k8s-master ~]# ls /tmp/download/ hosts [root@k8s-master ~]# cat /tmp/download/hosts 127.0.0.1 localhost localhost.localdomain localhost4 localhost4.localdomain4 ::1 localhost localhost.localdomain localhost6 localhost6.localdomain6 # 下载bucket目录到本地 [root@k8s-master ~]# mc cp k8s-minio/test/yum.repos.d /tmp/download/ --recursive ...m.repos.d/kubernetes.repo: 19.46 KiB / 19.46 KiB ━━━━━━━━━━━━━━━━━━━━━━━━━━━━━━━━━━━━━━━━━━━━━━━━━━━━━━━━━━━━━━━━━━━━━━━━━━━━━━━━━━━━━━━━━━━━━━━━ 87.10 KiB/s 0s[root@k8s-master ~]# ls /tmp/download/yum.repos.d/ docker-ce.repo epel-testing-modular.repo Rocky-AppStream.repo
文件操作 1 2 3 4 5 6 7 8 9 10 11 12 13 14 15 16 17 18 19 20 21 22 23 24 # 查看bucket文件列表 [root@k8s-master ~]# mc ls k8s-minio/test [2023-04-13 10:04:59 CST] 2.1KiB STANDARD hosts [2023-04-13 10:10:42 CST] 0B yum.repos.d/ # 查看bucket目录内容 [root@k8s-master ~]# mc ls k8s-minio/test/yum.repos.d [2023-04-13 10:05:34 CST] 710B STANDARD Rocky-AppStream.repo [2023-04-13 10:05:34 CST] 695B STANDARD Rocky-BaseOS.repo [2023-04-13 10:05:34 CST] 1.7KiB STANDARD Rocky-Debuginfo.repo [2023-04-13 10:05:34 CST] 360B STANDARD Rocky-Devel.repo # 查看bucket文件内容 [root@k8s-master ~]# mc cat k8s-minio/test/hosts 127.0.0.1 localhost localhost.localdomain localhost4 localhost4.localdomain4 ::1 localhost localhost.localdomain localhost6 localhost6.localdomain6 # 删除文件 [root@k8s-master ~]# mc rm k8s-minio/test/hosts Removed `k8s-minio/test/hosts`. # 删除目录 [root@k8s-master ~]# mc rm k8s-minio/test/yum.repos.d --recursive --force Removed `k8s-minio/test/yum.repos.d/Rocky-AppStream.repo`. Removed `k8s-minio/test/yum.repos.d/Rocky-BaseOS.repo`. Removed `k8s-minio/test/yum.repos.d/Rocky-Debuginfo.repo`. Removed `k8s-minio/test/yum.repos.d/Rocky-Devel.repo`.
curl客户端使用 上传文件 上传文件脚本,按实际情况修改host、s3_key、s3_secret,其中192.168.10.10替换为客户端ip.
1 2 3 4 5 6 7 8 9 10 11 12 13 14 15 16 17 18 19 20 21 22 23 24 25 [root@tiaoban ~]# cat push.sh #!/bin/bash export PATH=$PATH:/bin:/usr/bin:/usr/local/bin if [ $# != 2 ] ; then echo "Usage: `basename $0` my-bucket my-file.zip" >&2 exit 1 fi bucket=$1 file=$2 host=minio-api.test.com s3_key=GfuHooI5byVpGf2RGwl3 s3_secret=YpYqXKKhI4bNUmWWULa3qf5n5WPq3TDedb1uzREc resource="/${bucket}/${file}" content_type="application/zstd" date=`date -R` _signature="PUT\n\n${content_type}\n${date}\n${resource}" signature=`echo -en ${_signature} | openssl sha1 -hmac ${s3_secret} -binary | base64` curl -v -X PUT -T "${file}" \ -H "Host: ${host}" \ -x "192.168.10.10:80" \ -H "Date: ${date}" \ -H "Content-Type: ${content_type}" \ -H "Authorization: AWS ${s3_key}:${signature}" \ http://${host}${resource}
上传文件
1 2 3 4 5 6 7 8 9 10 11 12 13 14 15 16 17 18 19 20 21 22 23 24 25 26 27 28 29 30 31 32 33 34 35 [root@tiaoban ~]# ls anaconda-ks.cfg cfssl defaults.ini es go push.sh [root@tiaoban ~]# ./push.sh test defaults.ini * Trying 192.168.10.10... * TCP_NODELAY set * Connected to 192.168.10.10 (192.168.10.10) port 80 (#0) > PUT http://minio-api.test.com/test/defaults.ini HTTP/1.1 > Host: minio-api.test.com > User-Agent: curl/7.61.1 > Accept: */* > Proxy-Connection: Keep-Alive > Date: Sat, 06 May 2023 10:10:07 +0800 > Content-Type: application/zstd > Authorization: AWS bhUsp7nwc6XNPzoI:w2ddmcsQWOijC2BZJSGE4u7DgFc= > Content-Length: 55875 > Expect: 100-continue > < HTTP/1.1 100 Continue * We are completely uploaded and fine < HTTP/1.1 200 OK < Accept-Ranges: bytes < Content-Length: 0 < Content-Security-Policy: block-all-mixed-content < Date: Sat, 06 May 2023 02:10:07 GMT < Etag: "1b0bdd8f4c5f31ef5661380efcaefce5" < Server: MinIO < Strict-Transport-Security: max-age=31536000; includeSubDomains < Vary: Origin < Vary: Accept-Encoding < X-Amz-Id-2: e3b0c44298fc1c149afbf4c8996fb92427ae41e4649b934ca495991b7852b855 < X-Amz-Request-Id: 175C6BE8ACF79B53 < X-Content-Type-Options: nosniff < X-Xss-Protection: 1; mode=block < * Connection #0 to host 192.168.10.10 left intact
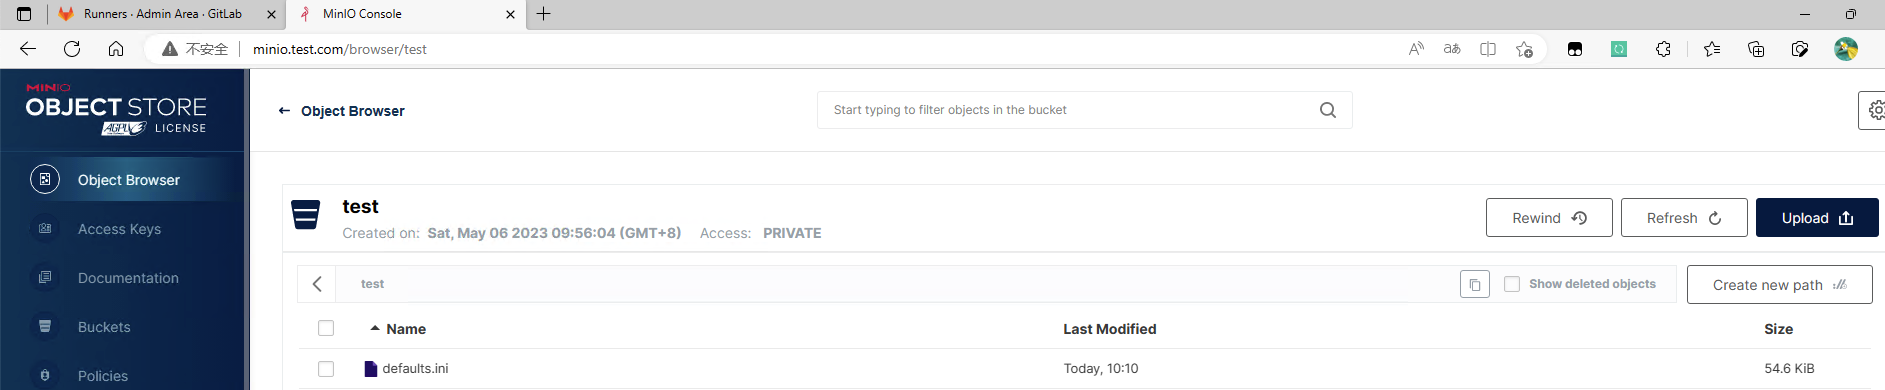
查看bucket文件
下载文件 下载文件脚本
1 2 3 4 5 6 7 8 9 10 11 12 13 14 15 16 17 18 19 20 21 22 23 24 25 26 #!/usr/bin/env sh if [ $# != 3 ] ; then echo "Usage: `basename $0` my-bucket minio-filename localfile" >&2 echo "Usage: `basename $0` test-bucket 1.log /tmp/1.log" >&2 exit 1 fi # User Minio Vars host=minio-api.test.com s3_key=bhUsp7nwc6XNPzoI s3_secret=w3KBPxMZ5Nw4apRGZY3uAHON7bkkKprP BUCKET=$1 MINIO_PATH="/${BUCKET}/$2" OUT_FILE=$3 # Static Vars DATE=$(date -R) CONTENT_TYPE='application/zstd' SIG_STRING="GET\n\n${CONTENT_TYPE}\n${DATE}\n${MINIO_PATH}" SIGNATURE=`echo -en ${SIG_STRING} | openssl sha1 -hmac ${s3_secret} -binary | base64` curl -v -o "${OUT_FILE}" \ -x "192.168.10.10:80" \ -H "Host: $host" \ -H "Date: ${DATE}" \ -H "Content-Type: ${CONTENT_TYPE}" \ -H "Authorization: AWS ${s3_key}:${SIGNATURE}" \ http://$URL${MINIO_PATH}
下载文件
1 2 3 4 5 6 7 8 9 10 11 12 13 14 15 16 17 18 19 20 21 22 23 24 25 26 27 28 29 30 31 32 33 34 35 36 37 [root@tiaoban ~]# ./pull.sh test defaults.ini /tmp/defaults.ini * Trying 192.168.10.10... * TCP_NODELAY set % Total % Received % Xferd Average Speed Time Time Time Current Dload Upload Total Spent Left Speed 0 0 0 0 0 0 0 0 --:--:-- --:--:-- --:--:-- 0* Connected to 192.168.10.10 (192.168.10.10) port 80 (#0) > GET http://minio-api.test.com/test/defaults.ini HTTP/1.1 > Host: minio-api.test.com > User-Agent: curl/7.61.1 > Accept: */* > Proxy-Connection: Keep-Alive > Date: Sat, 06 May 2023 10:17:18 +0800 > Content-Type: application/zstd > Authorization: AWS bhUsp7nwc6XNPzoI:sl8feCFiJC4MpaKSKrGU9HlDMLw= > < HTTP/1.1 200 OK < Accept-Ranges: bytes < Content-Length: 55875 < Content-Security-Policy: block-all-mixed-content < Content-Type: application/zstd < Date: Sat, 06 May 2023 02:17:18 GMT < Etag: "1b0bdd8f4c5f31ef5661380efcaefce5" < Last-Modified: Sat, 06 May 2023 02:10:07 GMT < Server: MinIO < Strict-Transport-Security: max-age=31536000; includeSubDomains < Vary: Origin < Vary: Accept-Encoding < X-Amz-Id-2: e3b0c44298fc1c149afbf4c8996fb92427ae41e4649b934ca495991b7852b855 < X-Amz-Request-Id: 175C6C4CF3EB56C4 < X-Content-Type-Options: nosniff < X-Xss-Protection: 1; mode=block < { [3529 bytes data] 100 55875 100 55875 0 0 1474k 0 --:--:-- --:--:-- --:--:-- 1515k * Connection #0 to host 192.168.10.10 left intact [root@tiaoban ~]# ls -lh /tmp/defaults.ini -rw-r--r-- 1 root root 55K 5月 6 10:17 /tmp/defaults.ini